
Tujuan :
- Mengetahui proses dan cara instalasi mikrotik
- Mengetahui cara instalasi mikrotik di GNS3
Bahan-bahan :
- GNS3
- ISO Mikrotik
Langkah-langkah :
Copy ISO Mikrotik
Copy ISO of Mikrotik

Taruh ISO ke dalam direktori GNS3 pada Local Disk C
Move ISO to directory GNS3 in Local Disk C
Move ISO to directory GNS3 in Local Disk C

Klik Continue jika muncul peringatan berikut
Click Continue if out the caution like this

Setelah selesai di copy buka Command Prompt as Administrator
After that Open Command Prompt with as Administrator
After that Open Command Prompt with as Administrator

Masuk ke dalam direktori GNS3 dengan perintah $ cd C:\program files\GNS3
Move to directory GNS3
Move to directory GNS3

Ketikkan perintah $ qemu-img.exe create -f qcow2 mikrotik.img 256M
Write the command $ qemu-img.exe create -f qcow2 mikrotik.img 256M
Write the command $ qemu-img.exe create -f qcow2 mikrotik.img 256M

Setelah berhasil ketikan lagi perintah $ qemu.exe mikrotik.img -boot d -cdrom "iso mikrotik"
After that write the command $ qemu.exe mikrotik.img -boot d -cdrom "iso mikrotik"
After that write the command $ qemu.exe mikrotik.img -boot d -cdrom "iso mikrotik"

Selanjutnya akan muncul tampilan seperti di bawah ini, selanjutnya tutup
Show like in the picture, and after that close it
Show like in the picture, and after that close it

Buka GNS3 dan buka Edit > Preferences
Open GNS3 Edit > Preferences
Open GNS3 Edit > Preferences

Pilih Qemu lalu klik Test Settings
Choose Qemu and click Test Setting
Choose Qemu and click Test Setting

Masukkan file ISO yang berformat .img. Ini dibuat saat tadi mengetikkan perintah di Command Prompt
Enter file ISO with format .img. It's create at time command in Command Prompt
Enter file ISO with format .img. It's create at time command in Command Prompt


Lalu klik Save
Click Save
Click Save

Buka Edit > Symbol Manager
Open Edit > Symbol Manager
Open Edit > Symbol Manager

Pilih icon yang berbentuk router dan masukan type Qemu Guest
Choose icon Router and for type choose Qemu Guest
Choose icon Router and for type choose Qemu Guest

Lalu Start
Click Start
Click Start

Akan muncul seperti tampilan di bawah ini
Can Show up like in the picture
Can Show up like in the picture

Setelah menginstall user akan tersetting secara default "admin" dan tanpa password
After the installation finish, the setting default with user "admin" and the emptied password
After the installation finish, the setting default with user "admin" and the emptied password
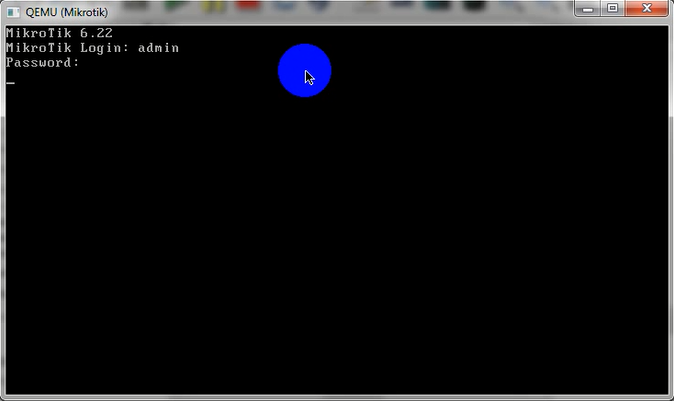
Berhasil masuk ke dalam mikrotik
Finish!
Finish!
